Wednesday, April 29, 2009

Driving Range Improvements

Our routine driving range maintenance primarily focuses on preparing it for day-to-day use, which consists of 2 guys mowing, cleaning, reseeding, and setting up hitting stations 6 nights per week. The most rigorous of these activities is cleaning off divots and applying soil and seed to the tattered tee areas. Depending on the season, we can easily use over 1,000 lbs of seed annually and spend up to 2 man hours per night on this process alone.

However, despite these regular practices, larger projects and other labor intensive work is periodically needed to maintain range quality. We have done just this over the past 18 months and made several improvements - some obvious and some subtle. The addition of the mats has undoubtedly been the most obvious change, but other projects and agronomic practices made have had a big impact on the quality and usability of our spaciously challenged range.

Two predominant issues have crippled our range for several years.
  1. Lack of tee space - resulting in very minimal, poor turf to hit from by mid-season
  2. Poor drainage and exceedingly wet soil conditions - resulting in later than desired spring opening dates and long, post rain event closures
Satellite image showing excessive wear on the range tee roughly 2 years ago during mid-season.


To address these problems, we have taken several corrective measures which include the following.
  • Resodding the range tee with a better performing grass variety - Fall 2007
  • Drainage work at the end and sides of range - Spring 2008
  • Addition of driving range mats - Summer 2008
  • Installation of more accurate and efficient irrigation - Summer 2008
  • Increase in intensity of aeration, topdressing, and fertilizing practices - Fall 2008 - present
  • Deep tine aeration of entire range floor - Spring 2009
  • Restoration of bunker edges and addition of sand material - Spring 2009
You may have seen some of these projects in the past couple Year in Review slide shows, but here is a pictorial recap of the work performed.


Two significant benefits we have seen from these activities already include less wear and tear on the tee surface and improved drainage throughout the range.

How does this affect you?
  • Earlier spring opening dates as seen this year.
  • Fewer range closures following rain events.
  • Healthier and thicker grass to hit from.
  • More aesthetically pleasing.
The tee quality shown below illustrates how valuable the mats were last season in providing periodic relief from the turf.


We are confident the range will continue to improve through these and similar efforts. As always, we appreciate your patience and cooperation during these projects and improvements.
Friday, April 24, 2009

The Whisker’s Are Back

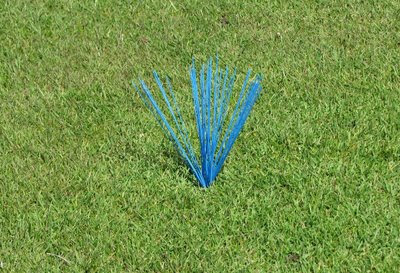
You probably recall all the whiskers in the fairways that were used to mark sprinkler locations during the irrigation installation process last season. They are small, wispy, colored markers.

Until the remaining few holes of the irrigation project are completed and all heads are in place (at which time we can accurately measure yardages from the heads to the green centers), we will be using the whiskers for measuring purposes.

The whiskers will be placed on the approximate center line of the fairway and color coded as follows:

RED - 100 Yards
WHITE - 150 Yards
BLUE - 200 Yards

One of the temporary 200 yard wiskers.


These markers should last for several weeks or until we can measure, order, and receive the new engraved sprinkler caps.

One thing that will help you now and into the future is this fact:

The sprinklers that run down the center line of the fairways are all very close to 20 yards apart.
The only locations where this is skewed a little is just before the last dogleg on holes #3 and #11, because these areas are wider than typical fairway widths and additional heads were needed to provide proper coverage. Due to this, there is not a center line row in these locations.

FYI – The heads in these wider areas are triangularly spaced at 60’ (20 yards). So if you can remember your Pythagorean Theorem, you can get your exact yardage!

Thursday, April 23, 2009

Course Update

Despite the rainy pattern we've had over the past several weeks, the course is shaping up quite well. The usual areas are still fairly wet from Monday and Tuesday's rain, but we have been able to mow greens, tees, approaches, and fairways. We are also continuing with clean up in the rough areas, keeping bunkers in playable shape, installing irrigation, and sprucing up the range area.

Irrigation System Update: At the end of today the remaining holes will be: #4, 25% of #11, and #12. With just these 2 and ¼ holes to go, and if the weather is reasonably cooperative, pipe pulling and sprinkler head installation should be completed by May 4-5. Thereafter, there will still be work involved with filling & flushing the lines, repairing settled and worn areas, adjusting sprinklers, wiring controllers, programming the computer, and testing.

One of the hundreds of new sprinklers shown here in #3 fairway.


Winter Injury Update: The seed that we planted on #3 & #11 greens and #4 tee has germinated nicely and is growing as we speak. Under optimal conditions, bentgrass seed will germinate within 7-10 days, but the cooler temperatures lately have delayed this process. Today we topdressed the seed areas which will provide a growth medium for the new and existing plants. We will continue to baby these areas for as long as needed to ensure the turf matures appropriately.

New seedling germination on #11 green.

Wednesday, April 22, 2009

A Snapshot of Pest Management

With the weather warming, the greens now open and more play, we are entering that frenzied time of year. Because of this and being away last week for training and testing, there was little time to add new posts. However, I found some time to write during the rain early this week. The training and testing refers to the renewal process for plant protectant applicator licensing, and I wanted to cover this topic while it is fresh in my mind.

In this and future posts, we’ll be covering many different topics and practices we routinely perform on the golf course throughout the year. One very comprehensive and technical practice that is performed in every season of the year, in varying degrees, is that of Pest Management.

The word “Pest” generally brings up thoughts of bugs to most, but on the golf course it means much more. The types of pests we’re concerned with are extensive and often include:
  • Diseases
  • Injurious & Nuisance Insects
  • Mites
  • Broadleaved & Grassy Weeds
  • Algae
  • Aquatic Weeds
  • Rodents
  • Nematodes
  • Undesirable Fish species
  • Undesirable Bird species
  • Some species of Mammals
We’ll likely write about these in detail at some point. For today’s post, let’s just say some of these are very difficult to manage, some are relatively easy to manage, but nearly all require specialized training, certification (satisfactory testing), and licensing by the State of Illinois to apply control products such as pesticides or plant protectants.

The term pesticide is any product that kills a pest. Some examples include:
  • Fungicides - control fungi (diseases)
  • Herbicides - control weeds
  • Insecticides - control insects
  • Algaecides - control algae
A more appropriate term we use for these products is "plant protectants". This is used because in many of our spray mixtures we apply, the actual pesticide component may be very small or even non-existent. Other products such as fertilizers, micronutrients, wetting agents, bio stimulants, vitamins, sea plant extracts, and plant growth regulators, often make up the bulk of our spray mixtures.

Knowing how to properly read a label is as important as the application of the material and understanding how it works. In addition to the info in this picture, other information found in labels include target pests, rates, restrictions, & environmental information.

Our strategy for controlling pests doesn’t begin with grabbing a product off the shelf and applying in to a given turf, tree, or landscape area. It begins with an entire integrated program we use called, Integrated Pest Management or IPM. IPM is the most efficient and environmentally safe approach to pest control. It includes non-chemical and chemical control methods such as:
  • Cultural control – improving plant health with proper mowing, fertility, irrigation, selecting resistant varieties, aeration, topdressing, pre-plant soil preparation, proper planting, mulching, and more.
  • Mechanical – physical elimination of the pests by; cultivation, pruning, manual removal, burning (prairie areas).
  • Biological – control utilizes living organisms such as predators (promoting insect feeding birds such as bluebirds), and using beneficial fungi that attacks certain injurious insects.
  • Chemical – control using approved plant protectants, at proper time and rate, and rotating with different mode-of-action chemistries to avoid resistance issues.
We consider these when we design our pest control programs but also consider many other factors including: Understanding Plant Protectants, Application Equipment (sprayers & spreaders), Calibration and Calculations, Product Labels, Drift Reduction (preventing movement of products to non-target areas), Applicator and Public Safety, Environmental Concerns, and Plant Protectant Laws and Regulations.

As you can see, Pest Management is quite involved and a critically important course management activity that we conduct regularly. The IL Dept. of Agriculture is the lead agency that regulates the various plant protectants we use to control pests, and they also conduct the training, certification testing, and licensing.

For a two day period every three years, we’re involved with this training and testing so we can not only retain our legal right to purchase and apply necessary products, but also to refresh our current knowledge, and remain informed of the latest pest occurrences’, control methods and products, and laws and regulations.

The importance of pest management education can never be over emphasized. This is what can happen when carelessness and a lack of education combine during a plant protectant spray - a lot of dead turf! (Don't worry... this is not Skokie CC!)

It was a long two-day period for me, as I was required to take 4 tests, to retain the appropriate licenses needed to manage the course and general club property. I’m happy to report I did pretty well with an average score of 94%. All I can think is that some of what the test writers think are the right answers, must be wrong!

Monday, April 13, 2009

Irrigation Update

Leibold Irrigation has continued to make good progress over the past several weeks. They have completed installation on 5 entire holes and 2 additional tee complexes since their return in mid-March. ComEd has also connected the transformer which allowed us to power up the pump station and completely charge the irrigation system with water.

Leibold plugging away on #6 fairway.


The building contractors are also on schedule with the exterior work on the pump house. They have started the Cultured Stone work which is turning out very nice.

Currently, there are only 4 1/2 holes remaining to complete; 4, 11, 12, 3, and half of 13. If weather allows us to continue at the current pace, we anticipate the installation process to be complete by mid-May. This would include the installation of pipe, wire, heads, and valve boxes. The remaining work after this will consist of fine tuning all system components (pump station, heads, valves, and software), restoration work of worn turf areas, and other minor details.

Until the project is complete, we will continue to close the necessary holes Monday through Thursday as done last season. However, no hole closures or interruptions will be seen Friday through Sunday. Thanks again for your patience in this regard, and we look forward to the project's end, as well as the new system's beginning.

Rolling Fairways

Soft and spongy turf is the norm each spring which results from winter freeze/thaw cycles and saturated conditions. Closely mowed surfaces such as greens, approaches, and fairways require rolling before a first mow is performed. This is to ensure the precision cutting units (consisting of reels, groomers, and bedknives) on each machine provide the best possible cut without scalping or marking the turf.

Greens and approaches are rolled each spring with the Salsco sidewinder rollers which you have probably seen during the golf season. Until this year, we have rolled the fairways by simply driving the fairway mowers over the turf with the cutting units down and reels disengaged. This provides reasonably good results, but we have recently been thinking fairway rollers would do the best job.

These are the rollers purchased this spring to provide better results on our fairways.


The 3-gang rollers are easily pulled by our tractors and can be filled with water to provide a very smooth surface. Not only are the rollers great for early season, but they have several applications we plan to take advantage of including:
  • Smoothing and firming fairways/approaches to improve playability and ball roll during tournaments and other events.
  • Reducing disruption following aeration by flattening out tine holes and lifted turf.
  • Rolling newly planted sod - creates good soil to root contact and reduces air pockets that dry out emerging roots.
  • Improving seed to soil (or aeration core to soil) contact in new turf areas for better establishment.
  • Smoothing out "puffy" turf conditions on fairways seen during humid periods.

Friday, April 10, 2009

Tree Management Part II - Removals

This is the second Tree Management post and will focus on the removal activities conducted over this past winter. (Click here to see the first Tree Management post focused on pruning.)

There are few that don't enjoy stately, well-placed trees. They provide shade and screening; frame course features; provide scale, balance, and depth perception; provide interesting textures, shapes, and colors; provide wildlife habitat; absorb carbon dioxide and produce oxygen; reduce dust and particulate matter; stabilize soil; prevent erosion; and the list of positive attributes goes on. In comparison however, they limit play options; the shade they cast dramatically impacts turf growth and quality; root systems plug tile lines and damage hard surface paths; they block interesting views and vistas; can be easily damaged in storms creating additional damage to turf and structures; require regular costly pruning, disease, and insect control tasks; create weed problems when they seed; create expensive ongoing debris clean-up tasks; (seeds in spring, branches during summer, leaves in fall) and this list of negative attributes goes on.

So how do we decide if a tree should be removed at all? And, if so, how do we decide what trees should be removed? Some become obvious when destroyed by storms, but in other cases it’s not so clear. As we’ve mentioned in the past and recently in the Year in Review, we use the 5-D System.

The 5-D’s that guide our tree removal actions:

• Diseased - significant infection that is untreatable or too costly to treat.
• Decayed/Dead - significant decay, or complete death, resulting in structural weakening and hazardous conditions.
• Damaged - significant structural damage from high winds and/or lightning.
• Disfigured - Unattractive shape from over crowding of adjacent trees or from damage.
• Disruptive – Affecting playability. Causing traffic concentration, excess turf loss from shade, root system impacts to turf and drainage tile systems.

This past winter we did have a few trees that fell within these guidelines. The following list shows the locations and conditions that warranted removal:

This American Elm on the left side of #13 fairway unfortunately became infected with Dutch Elm Disease despite our treatment efforts and had to be removed. The decline is evident on the bark shown in the picture and even more in the canopy (not pictured).

We will continue to use this system when evaluating potential tree removals. It has been, and will continue to be, a critical part of our tree management program.

Wednesday, April 8, 2009

The Greens are Open!

The weather has cooperated this week allowing us to uncover and open the greens. The decision to re-cover the greens at the end of last week has proved beneficial, as they have bounced back nicely from their slight set back.

Open and ready for play - the covers have enhanced green up and helped reduce the contrastive, mottled turf appearance.

We opened the front 9 greens today with a fresh mowing and relocation of the pins. Tomorrow looks to be another nice day, and the back 9 greens should be ready to play by early afternoon. As mentioned in our post last week about #3 and #11 winter injury (see below post) we are in a critical stage in the recovery process. We ask that you PLEASE do your best to avoid walking on these damaged areas.

Our plan for the remainder of the week is to plug away at many other course-opening tasks such as fairway, approach, and tee mowing, course accessories placement, bunker raking, and general clean up. The spring start-up list is always jam packed with numerous jobs, but we are making steady progress so far.

Be on the lookout for upcoming posts on topics such as Tree Removals, Irrigation Update, Fairway Rolling, and others.

Monday, April 6, 2009

Winter Injury Recovery Process - #3 & #11 Greens

You’ve likely seen our earlier post showing the Crown Hydration injury (available here) that we incurred on greens #3 and #11. It’s been a few weeks since then, and we felt it was time to discuss our response strategy to enhance the recovery.

When we first saw the injury we were, of course, alarmed by what looked like a devastating injury and what would clearly be a long road to recovery. We initially had visions of an extended temporary green on #11, significant sod needs, potential uneven seams, lengthy healing time, and unattractive appearance issues. Well, while we still have a ways to go before this green is back to normal, we are happy to report that there are encouraging signs that the damage may not be as extensive as we once thought.

Both damaged areas on #3 and #11 have been uncovered each day (when conditions warranted) and re-covered each night to keep soil temperatures warm and growth constant. This will be continued until the green is fully recovered.

We brought plugs from the damaged area into the office, potted them, and placed them in a south window for observation. After a week indoors, we began to see some degree of turf shoot emergence, which was encouraging, but it appeared as though there was not enough to provide complete turf cover. We knew then that as soon as weather conditions were appropriate we would need to initiate the repair process.

Our overseeding process involved:

• Creating thousands of small holes with a hand overseeding tool affectionately called “The German Tamp”. These holes provide an ideal site for seed to be placed, insuring necessary seed to soil contact and protective channels once seed germinates and seedlings begin to emerge.

• Spreading a mixture of bentgrass seed and rooting amendment (containing nutrients, vitamins, and bio-stimulants) using multiple passes with drop spreader.

• Lightly brushing the seed into the holes to insure soil contact
• Topdressing the areas with a dried green-dyed sand to lightly cover the seed and prevent it from washing away. The colored sand is used primarily to absorb heat energy to enhance soil warming and germination, but also takes the edge off the stark, light brown, damaged areas.
• The entire area is then brushed one more time and then recovered.

This work was completed last Thursday evening just in time for a perfect light rain that fell early Friday morning, settling all materials into the holes and green turf canopy.

Our work going forward will be to complete this same process on #3 green (a much smaller area) and #4 tee. We’ll monitor frequently and keep the seeded areas moist until the areas have fully recovered. Number 11 green will be kept closed on Mondays and days with light play expected to give it every opportunity possible to recover and new seedlings to establish. Thereafter, we’ll provide light and frequent fertilization and lots of TLC, and with a little help from Mother Nature in the temperature and sunshine department, it shouldn’t be long before this green is back to full coverage. It will require a lot of extra care this entire year, as new plants slowly mature but we’ll do our best to get it back to normal just as soon as possible.

Thank you in advance for your patience and understanding during this recovery process.

Friday, April 3, 2009

"Are the greens open yet?"

That's the question that begins to resonate each year at this time. So, we want to both answer the question, and explain the thought process involved when deciding to open the greens.

It’s been another typical atypical spring at SCC! We had some very nice early - mid March weather, which brought us welcomed warming and drying, but recently conditions have left a lot to be desired for both course work and playing golf. With snow last weekend and cloudy and rainy periods this week, ground conditions have again become soggy and soft. Hopefully we’ll see favorable weather again soon!

In spite of this less than ideal spring, we have made good progress toward opening the greens, and I’m happy to say that by the time the club reopens (April 8th), or within a day or two of that day, they should be ready to play. They have been uncovered (except for parts of No. 3 & No. 11 greens still recovering from winter injury) for several days, to acclimate and dry. They have also been rolled and mowed three times resulting in much firmer surfaces.

Unfortunately the weather forecast for this weekend and early next week calls for colder temperatures and the possibility of even more snow. Overnight lows may again drop below freezing and because of this we will be “shuffling” the covers one more time and recovering the greens. Since the last uncovering, the colder conditions have actually caused a slight decline in the color (several nutrients affecting color become unavailable when soil is cold) and a sharp drop in growth rate.

Comparison of greens coloration: The top picture depicts obvious green-up after the first cover removal, while the bottom picture shows the color decline 17 days after the 2nd removal.

So this brings us to the title question, but perhaps you might also ask; “Why do we have to wait at all to open the greens in the spring”? or, “Why not open the greens after pulling the covers? Good questions indeed.

There are several important reasons for not rushing the opening of greens in the spring:
  • Often in early spring the ground surface thaws while still frozen below. Any traffic (players, vehicles) during this condition can easily result in turf root systems being sheered as the thawed layer shifts from the solid, frozen, non-resilient lower layer.
  • Wet soils (typical of early spring) are much more susceptible to compaction, which is a collapse of soil structure and vital pore (root, water & air) space leading to weakened root systems, lower turf vigor, and bumpy, and irregular surfaces.
  • Cold and cloudy spring conditions are not conducive to active turf growth. Therefore, turf has less wear tolerance and recuperative potential resulting in damage from normal player traffic and ball mark injury.
  • This decreased wear tolerance often predisposes the turf to potentially damaging diseases such as Microdochium Patch and Basal Crown Anthracnose.
Though an extreme case, this illustrates the extent of damage a green can potentially incur when play is permitted during very wet, early spring conditions.

So every year at this time we consider these turf quality and playability affecting issues and make sure that conditions are appropriate before the greens are opened. This cautious concern is one of many reasons our greens remain in high quality condition and playability. Another key reason is your patience at this time of year in allowing us to let soil and weather conditions become favorable prior to us proceeding with greens opening preparations. We Thank You and your Greens Thank You!

Thursday, April 2, 2009

Fence Line Remodeling

In our ongoing effort to improve the aesthetic presentation of the golf course, we have removed 4 severely decaying and disfigured spruce trees along the fence by #12 alternate tee. They have been on a steady decline for several years and needed to be taken out.

Deterioration of canopies shown below; note the old, rusted chain link fence.


Besides their unsightly appearance, these trees were encroaching on the cart path and making it increasingly difficult to maintain quality turf in the area. We have also removed a section of the old chain link fence which stood behind them, and replaced it with more split rail fencing. We simply extended the existing split rail fence that originates at the bridge.

Installation of the new fencing.

We also plan to grow fescue and other tall grasses in the area where the trees were. This will help blend the area into the existing adjacent landscape of native plants and grasses.

The pictures below show the area before (top) and after (bottom) the work was completed.


***If you are a first time visitor to this blog and would like to view our Welcome Message, which includes the 2008 Year in Review slide show, click HERE.